Parts and Details
1. Office Button – Click the Office Button to find a drop down menu containing options, such as: open, save, and print. Also shows previously opened files, which you may choose to “pin” them to make them “permanent” choices.
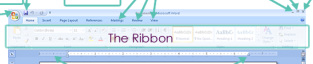
2. Ribbon – The Ribbon is the strip of buttons and icons located above the work area in Word 2007. The Ribbon replaces the menus and toolbars found in earlier versions of Word. Each ribbon contains groups of command
buttons with common purpose. Each ribbon contains 7 tabs.
buttons with common purpose. Each ribbon contains 7 tabs.
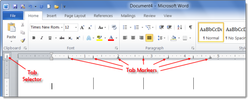
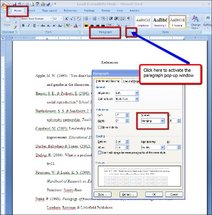
3. Tab Selector button – You can easily set tab stops by clicking on the desired position on the ruler. This button allows you to determine which type of tab will be set left aligned , right aligned , center aligned or
decimal tab . Clicking on this button will allow you to change the tab style.
decimal tab . Clicking on this button will allow you to change the tab style.
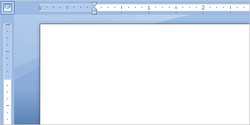
4. Rulers – Gives you an idea of where you are on the page.
5. Document – This is what you are typing/what will print out.
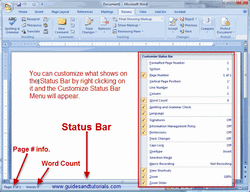
6. Status Bar – This row can be customized by right-clicking and selecting desired options. Desired options may
include page number/number of total page, word count, insert/overtype mode, caps lock, and zoom slide.
include page number/number of total page, word count, insert/overtype mode, caps lock, and zoom slide.

7. View Shortcuts – These four buttons allow you to change the way you view your document on the screen. From left to right they are: print layout, full screen reading, web layout and draft. These can be added/removed by right clicking anywhere on the status bar and checking/unchecking View shortcuts.
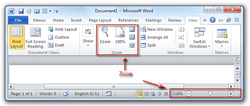
8. Zoom Slide – Allows you to increase/decrease the amount of the document you see on the screen.
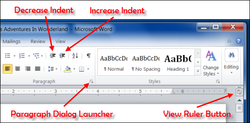
9. View Ruler Button – Allows you to view/hide the rulers.
10 . Screen Split Button – At the top of the vertical scroll bar is a new button. Just below the double arrow is a tiny button that looks like a minus sign that lets you split your screen in two when double-clicked. Double-clicking it a second time will unsplit your screen.
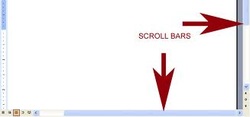
11. Scroll Bars – Allows you to view entire workbook by moving it up, down (vertical scroll bar), left or right (horizontal scroll bar).
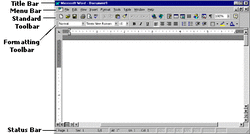
12. Title Bar – Shows name of program and open document. Also contains minimize, maximize and close buttons.
13. Hanging Indent – The opposite of a first line indent. It is often moved to the right of the first line indent, which allows the remaining lines of a paragraph to be indented according to placement of the triangle.
